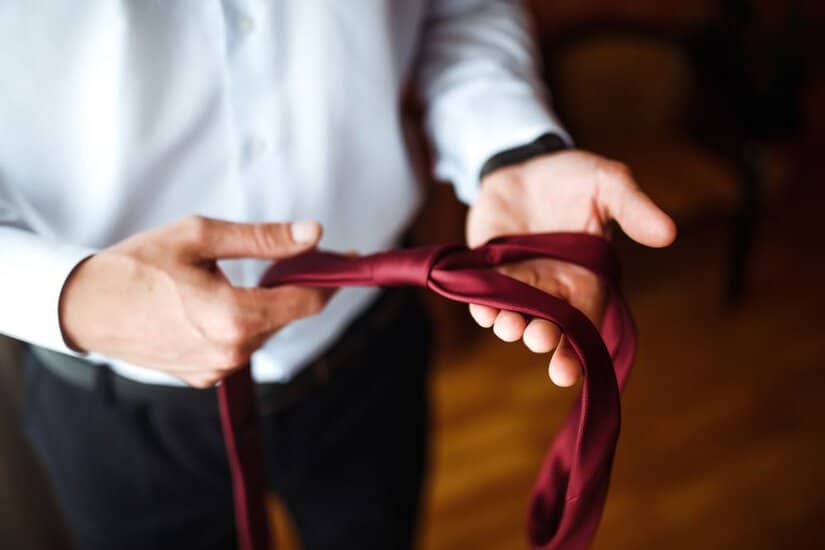
Tying the knot at a wedding is not just a figurative term for getting married—it also involves the literal action of tying a tie or performing a symbolic gesture during the ceremony. This practice represents the unbreakable bond and unity that marriage signifies. From the traditional necktie knots worn by those in the wedding party to the ceremonial actions of tying ropes or cords, each knot serves as a visual and tangible metaphor for the commitment being made.
As I explore the various aspects of wedding knots, I focus on the elegance and symbolism behind them. The Windsor Knot, for instance, is a timeless choice for the groom’s necktie, renowned for its symmetry and appropriateness for a formal occasion. For a ceremonial action during the nuptials, couples might opt to tie a Fisherman’s Knot, which symbolizes the strength of the union as it is said to grow stronger under pressure.
Whether selecting the right tie knot to complete a wedding outfit or incorporating knot-tying into the ceremony, it is an element that combines tradition, personality, and meaning. It’s a small detail that, when done thoughtfully, can leave a lasting impression and symbolize the strength and unity of the couple’s new life together.
Understanding the Basics of a Knot

It’s crucial for the success of tying a knot to recognize the type of fabric you’re working with. Thicker, coarser fabrics can be more forgiving, while silk or polyester require a gentler touch and more precision.
Here’s how to ensure the knot complements a suit and works efficiently:
- Choose the Right Knot: Not all knots are created equal. Select a knot style that matches the occasion and the attire. For a wedding suit, a classic Windsor knot is a popular choice for its symmetrical, triangular shape.
- Step-by-Step: Follow the steps carefully, beginning with the wide end of the tie on your right and extending about 12 inches below the narrow end. Then, cross the wide end over the narrow end, turn it back underneath, bring it up, and pull it through the loop, securing the fabric without over-tightening.
- Smooth Fabric: Ensure the fabric remains smooth and free from wrinkles. It should lay flat against the shirt, presenting a neat and composed appearance.
| Step | Instruction |
| 1 | Lay the tie around my neck with the wide end lower than the narrow end. |
| 2 | Cross wide over narrow to create a base loop. |
| 3 | Wrap wide end underneath and pull snug. |
| 4 | Bring wide end up, through the loop. |
| 5 | Wrap wide end around front, from right to left. |
| 6 | Pull wide end up through the loop again. |
| 7 | Slide wide end down through the knot in front. |
| 8 | Adjust for comfort and symmetry. |
Choosing the Right Tie for the Occasion

When attending a wedding, your tie choice can significantly influence your overall appearance. It’s not just a piece of clothing; it’s a statement of style and respect for the occasion.
Evaluating Fabric and Pattern
Fabric: For weddings, a silk tie is the quintessential choice. Silk exudes elegance and pairs well with the formality of wedding attire. It drapes beautifully and has a subtle sheen that complements a suit or tuxedo without overshadowing it.
Pattern: Choosing the right pattern often depends on the wedding’s dress code. For a formal wedding, I recommend a solid color or a simple pattern, such as stripes or paisley. These patterns are time-honored and blend nicely with the wedding’s sophistication. For less formal weddings, I might consider more playful patterns that still maintain a polished look.
The Windsor Knot Family
The Windsor Knot Family stands out for its elegance and symmetrical shape. These knots provide a look of confidence and sophistication that is highly suitable for weddings and other formal events.
Classic Windsor Knot
The Classic Windsor Knot creates a broad, symmetric, triangular knot, positioning it as a quintessential choice for a polished appearance. It’s crucial for my tie to have a thick material when I tie a Classic Windsor knot to ensure the knot’s fullness and standout look. This knot is not just a statement of style; it’s practicality in its most elegant form.
Half Windsor Knot
For occasions that require a touch of formality without the heft of the full Windsor, I opt for the Half Windsor Knot. This knot is easier to tie than its fuller counterpart, offering a symmetrical and triangular shape that is less wide yet still elegant and suitable for most dress shirts.
It serves well when I want a knot that is not too large but still conveys a sense of formality. Check out this video for a detailed explanation on how to tie a Half Windsor Knot.
Double Windsor Knot
Often known as the Double Windsor Knot, the Classic Windsor Knot secures its place in the Windsor family with its sturdy and symmetrical presence. When preparing to tie a Double Windsor, keep in mind it requires more tie length than other knots, making it ideal for ties that are a bit longer than average. It’s a statement piece to wear when I intend to project authority and meticulousness.
Alternative Tie Knot Styles
When selecting a tie knot for a wedding, there’s a range of knots beyond the classic Windsor. These options offer various levels of formality and complexity, suitable for different collar styles and occasions. I’ll outline a few popular alternative tie knot styles that can add a unique touch to wedding attire.
Four-in-Hand Knot
The Four-in-Hand Knot is the epitome of simplicity and elegance. It’s an asymmetrical knot that’s perfect for nearly all occasions, and because of its smaller size, it suits narrow spread collars exceptionally well. I find this knot ideal when aiming for a dapper yet understated look.
Eldredge and Trinity Knots
For those who prefer intricate and eye-catching knots, the Eldredge Knot and Trinity Knot are top choices. The Eldredge knot showcases a complex pattern, making a bold statement. Meanwhile, the Trinity knot has a three-way symmetry that creates a distinctive, trefoil-shaped design. Both knots tie perfectly with solid color ties to truly stand out and are conversation starters.
Small and Subtle Knots
For a refined, minimalist vibe, small and subtle knots are my go-to choices. These simple knots, like the Prince Albert Knot maintain an element of sophistication without overpowering the rest of the ensemble. They complement a tightly fitted collar and work well for those seeking elegance through simplicity.
Dressing for the Big Day

When I attend a wedding, I take into account the dress code, venue, and season to ensure my attire is appropriate and cohesive with the overall aesthetic of the event. Properly dressing for the day not only shows respect for the occasion but also contributes to the wedding’s visual harmony.
Groom’s Attire
Select a well-tailored suit or tuxedo depending on the formality of the ceremony. The color scheme should match the wedding’s palette and often choose a pocket square that complements the colors of the bridesmaids’ dresses. The venue is a critical factor; for an outdoor wedding, I might choose a lighter fabric, whereas an indoor or evening event may call for more traditional, darker formal attire.
- Suit/Tuxedo: Selected based on the formal nature of the event.
- Shirt: Crisp, formal, and matching the suit.
- Pocket Square: Adds a touch of personality and color.
- Shoes: Polished and appropriate for the suit/tuxedo choice.
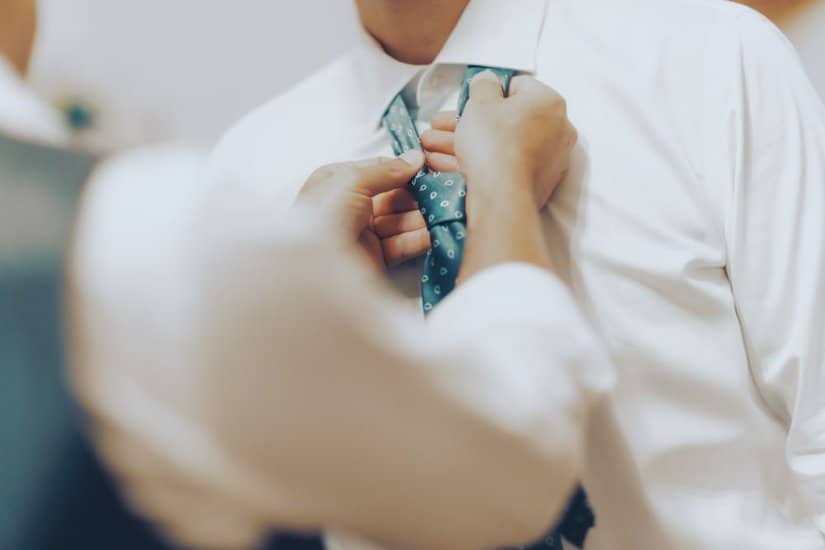
Groomsmen Coordination
Coordination involves selecting suits in a similar color palette and using accessories, like ties or pocket squares, to echo the wedding’s theme. The groomsmen’s attire is slightly less formal, which may be reflected through a less elaborate tie or a simple buttonhole flower matching the bridal bouquet.
- Suits: Coordinated with the groom but slightly less formal.
- Accessories: Ties, cufflinks, and pocket squares align with the wedding theme.
- Shoes: Uniform and clean, ensuring each groomsman presents well.
Tie Knot Tutorials
These techniques will ensure that you can learn to tie a tie confidently and create that coveted dimple for a polished look.
Step-by-Step Guides
When I approach tie knots, starting with a simple yet elegant Four-in-Hand Knot is always my recommendation. It’s straightforward and suitable for most ties and occasions.
- Start with the wide end of the tie on your right side and extend it about 12 inches below the narrow end.
- Cross the wide end over the narrow end and then bring it under the narrow end.
- Bring the wide end back over in front of the narrow end again.
- Pull the wide end up and through the loop around your neck.
- Hold the front of the knot loosely with your index finger and bring the wide end down through the front loop.
- Remove your finger and tighten the knot carefully to the collar by holding the narrow end and sliding the knot up.
For achieving the perfect Windsor Knot, known for its symmetrical triangular shape, you’ll need a bit more patience. The key is to pay attention to the tension and the positioning of the active end as you form the knot.
Video Demonstrations
Sometimes, it’s easier to learn visually, and that’s where video tutorials come in handy. I’ve found a couple of instructional videos that walk you through the process in an easy to learn manner.
- For a quick and effective tutorial on the Four-in-Hand Knot, check this out: How to Tie a Tie – Four-In-Hand Knot. It’s beginner-friendly and breaks down each step.
- If you’re aiming for the more robust Windsor Knot, this visual guide is excellent: How to Tie a Tie | Windsor Knot. It gives clear, step-by-step visual guidance to ensure you tie the perfect knot.
Remember, practice makes perfect, and with these guides, you’ll be well on your way to mastering your tie knot.
Accessorizing Your Wedding Attire

When I dress for a wedding, I make sure my outfit is completed with the right accessories. They are like the final pieces of a puzzle that bring everything together—the distinct pocket squares and cufflinks, and the choice of a collar that complements my suit.
Pocket Squares and Cufflinks
A pocket square adds a touch of elegance to my suit. I make sure the color and pattern complement my outfit without overshadowing it. The pocket square should be neatly folded; the classic straight fold is sharp and works for most occasions. For cufflinks, I consider the theme of the wedding. Sleek, simple designs tend to be fail-safe choices, whereas more ornate cufflinks can work well for a formal event.
- Pocket Square: Fold should be neat, square complements the suit
- Cufflinks: Choose simple or formal based on wedding theme
Choosing the Right Collar
The choice of my collar is dictated by the style of my suit and my personal preference. A spread collar offers a modern look and provides ample space for a thicker neck loop if I choose a wider tie. For a suit with a more classic cut, I might opt for a more traditional collar. It’s important that the collar sits comfortably and looks proportional to my neckline.
- Collar Style: Match to the suit style and personal preference
- Neck Loop: Ensure sufficient space for the tie
Advanced Tie Knot Techniques

Advanced techniques can transform a simple piece of fabric into a statement of class and sophistication, especially for weddings or formal events. I’ll share my expertise on creating the perfect dimple and adjusting knot tightness, both of which are essential skills for anyone looking to elevate their tie game.
Creating the Perfect Dimple
The dimple is the small indent found just below the knot of the tie that adds a touch of elegance and personality to your look. A symmetrical dimple can be the difference between a tie that looks haphazardly tied and one that looks meticulously crafted.
To achieve a neat dimple, ensure you make a small crease in the fabric with your thumb and index finger as you tighten the knot. The goal is to have the dimple centered and the width of the tie naturally shape it as you adjust.
Adjusting Knot Tightness
The tightness of your tie’s knot is another factor in achieving a medium-sized knot that’s balanced and proportional to your collar. Whether opting for a Half-Windsor knot, Double Windsor knot, or even the more elaborate Full Windsor knot, maintaining an even pressure as you pull the fabric through each stage is key.
The final tightness should ensure the knot is secure without compressing the fabric to the point of wrinkling, ensuring a dignified and symmetrical outcome.
By focussing carefully on these techniques, you can consistently tie knots that are both stylish and appropriate for any high-caliber event, including weddings. Remember, practice is the pathway to perfection.
Frequently Asked Questions

In this section, I cover some of the most asked questions about tying wedding knots, focusing on the practical steps and the appropriate styles for different wedding roles.
What are the steps to tie a common wedding knot?
To tie a common wedding knot, like the Four-in-Hand, start by draping the tie around the neck, adjusting it until the wide end is longer than the narrow end. Cross the wide end over the narrow one, bring it around and behind, then cross it over again. Pull it up through the neck loop and down through the knot you’ve just created, tightening it to the collar.
Which tie knot is most suitable for a wedding setting?
A Half Windsor knot is most suitable for a wedding due to its versatility and symmetry. It works with most tie materials and collar types, making it a great choice for groomsmen or guests seeking a balance between formal and stylish.
What is the easiest way to tie a formal tie for weddings?
The easiest way to tie a formal tie for weddings is the Four-in-Hand knot. With fewer steps and a more casual style, it’s perfect for wedding guests who want a straightforward yet elegant look.
Can you explain how to tie a Half Windsor knot for wedding attendees?
To tie a Half Windsor knot, place the tie around my neck and cross the wide end over the narrow end. I bring the wide end around and behind the narrow end, then pull it through the neck loop. Next, I bring the wide end over from the opposite direction, pull it through the neck loop again, and down through the loop I’ve just created in the front. I adjust for symmetry and tightness.
Which knot is considered the traditional choice for wedding attire?
The Full Windsor knot is considered the traditional choice for wedding attire. Its large, symmetrical triangle conveys a sense of formality and elegance suited for the most classic wedding looks.
What is the most elegant tie knot for a groom’s wedding outfit?
For a groom’s wedding outfit, the most elegant tie knot is often the Bow Tie for its classic and sophisticated appearance. It requires a bit of practice but adds a touch of timelessness and character to a groom’s ensemble.

Samoel Ovanessian is the founder and creator of StylishAlpha.com – a website dedicated to men’s fashion. As a proud owner of more than 200 ties, he loves digging through new clothing combinations for everyday use, formal events and even just for fun. You can read more about Samoel here.